|
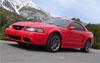
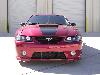
2003 Jack Roush Mustang |
| |
8702 |
|
| |
|
|
|
While everything was being done on the car, I took the opportunity to give her home a makeover.
This was long planned, but just one of those things that you can get to tomorrow. |
| |
|
|
|
The always great before shot |
| |
|
|
|
|
| |
|
|
Lets get started...
After a through cleaning and rearranging everything to make some room ( would have been easier to rent a storage shed for 2 weeks )
This project was a "we" , the wife and I started out by applying the epoxy base white and taping off the checkered boxes, ( we found out it was easier to paint them by had rather then masking, after half the front section was done ) we decided on 16" x 16" squares. |
|
|
|
 |
| |
|
|
|
|
|
 |
| |
|
|
|
The front half finished, on to the back , there was a floor pit that I had dug out when the garage was originally built but had seen very little usage so we decided to fill it in and concrete it over. Walls were fur'd out and 1/2 OSB with a few sections of peg board to retain some usability. |
| |
|
|
|
|
|
 |
| |
|
|
|
|
|
 |
| |
|
|
We never want to have to paint a checkered floor again LOL.
The Wall
I started out gluing the acrylic mirror tiles ( 2' x 2' squares) , switched to screwing them in on the corners after about 3 of them, I think I was using the wrong type of glue or it was still to damp , they kept sliding out of place. |
|
|
|
 |
| |
|
|
|
|
|
 |
| |
|
|
|
The original plan was to have the entire wall mirrored but we then decided to add the boarder ( red and black squares, 1' x 1' ) after 20' and put some peg board for the necessities.
Since I didn't do the entire wall I have about 20 extra pieces of 2' x 2' mirrored tile ( protective film coating ) |
| |
|
|
|
|
| |
|
|
|
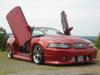
The Fruits of our labor
We now not only have people that stop to see the car as were detailing it, there stopping to see the garage as well.
This turned out to be one GREAT Showroom.
( I kept the images a little larger.. Sorry anyone still using dialup ) |
| |
|
|
|
|
| |
|
|
|
Thanks for looking. |
| |
|
|


 Garage - added 4.28.06