logosmall
 
GSM# 005249
thess6225
TEAM
INTERCEPTOR 2

38666

points

Making Modifications

updated: Jul 26th 2007 @ 09:35 AM
     

  Making Modifications


"Eleanor Style" Grill Install
 
The following pictures show the detailed steps to replace the original grill with the 3dCarbon "Eleanor Style" Grille.
 
Here's the kit form 3dCarbon
 
 
Step 1 - Open the hood
  
 
Step 2 - Remove all screws securing the front bumper


Step 3 - Slide the bumper forward to make room to access grill release tabs
Note - It was not necessary for me to completely remove the bumper as the instructions indicated.  But be careful - bumper is just hanging there!
 
Step 4 - Disconnect the fog light and release the grill by freeing the grill release tabs
 
 
Step 5 - Transfer the for light from the original grill to the new grill
 
 
Step 6 - Replace grill and reconnect fog light using the included wiring harness extension - secure the extended harness using included zip ties
 
 
Step 7 - Push bumper back into position and re-secure using original fasteners
 
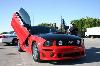
The completed project -
 
Yes, it started raining right in the middle of the project!


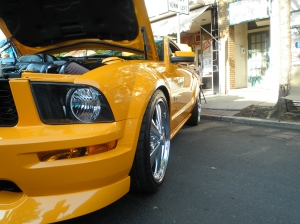
Classic Design Concepts Aggressive Chin Spoiler Install
 
Next appearance modification was to install the Classic Design Concepts Aggressive Chin Spoiler.  These pictures show the major steps required to install the aggressive chin spoiler.

Step 1 - Remove front wheels for easier access to bumper securing screws
 
Step 2 - Remove lower 2 bumper mounting screws in wheel well and remover radiator cover tray screws and remove cover from car
 
 
Step 3 - Disconnect the lower grill by freeing the grill release tabs and remove
Note - Prior to removing the lower grill mark the lower part of bumper for cutting.  Instructions call for a cut to be made 1" back from the leading edge of the lower bumper rail.  The front edge of the lower grill is exactly 1" back and can be used as a guide for making a straight line.
 
Step 4 - Mark the bumper and grill supports and tabs for cutting - remember measure twice, cut once!!!  Use a sharp utility knife for this job.  Take your time and change the blade often.  I used four blades during this operation.
 
 
Step 5 - The scary part is over!!! This step involves preparing the chin spoiler and car for the adhesive tape application. It was necessary to remove a bit of molding flash prior to applying tape as the flash would have interfered with the tape.  Use alcohol and supplied adhesion promoter to prep the bumper and spoiler.  This step is extremely important to insure a good adhesion of the mounting tape to the bumper and the spoiler.
Note - Make sure you attach adhesive tape to the spoiler before test fitting to the car.  This thickness of the tape will affect the fit just a bit.
 
Step 6 - Test fit the spoiler and make any minor trimming adjustments to the bumper or spoiler that are needed to correct the fit. 
 
Step 7 - Once you are satisfied with the fit, temporarily tape the new lower grill opening trim ring to the upper bumper to hold in place and mark position of 7 trim ring mount screw holes.  Remove bumber and drill holes.
 
Step 8 - Peel about 4" of adhesive tape backing away from each end of tape and carefully reposition spoiler on car starting in the middle and stretching spoiler ends into both wheel wells.  Attach 7 trim ring screws with the washers on the under side of the bumper.  Replace the bumper screws in each wheel well and when you are satisfied every thing is lined up peel the adhesive tape backing off of tape pressing spoiler against bumper to insure a good bond.
Note - The middle most trim ring screw is directly over the area where the middle support bracket was in the bumper.  This had been removed and there is now a large gap.  You do not drill a hole in this area.  The manufacturer's instructions tell you to use the supplied washer to span this gap and secure the trim ring, but there was very little overlap of the washer on the bumper and I elected to use a small (4" long) flat metal bar with a hole drilled in the center to span this opening in place of the supplied washer.
 
Step 9 - Admire the results and replace the front wheels!!!
I was too busy admiring the results and forgot to replace the wheels!!!


Next Page


Page Listing
2007 Grabber Orange Mustang GT15789 views
Modifications3398 views
Making Modifications1873 views
Additional Exterior Pictures1815 views
Interior Pictures1885 views
Original Exterior Pictures1673 views
Gotstang Awards3755 views
Hunts and other Cool Pics1935 views
Car Shows1788 views

Last 3 User Comments
stickman
Jan 13th, 2010 @ 3:28 PM


“”
Replying to:
Replying to:

nice ride....love the colour


Do you mean the White on or the Orange one??? LOL  Of course you know I like your 93 too - sweet ride!

the orange one, lol

Balatgek1
Jan 3rd, 2010 @ 9:04 PM


“”

Love That COLOR

CozyWorld
Oct 12th, 2009 @ 8:46 PM


“”

If you check out my website, i have the same strut covers as you, HOW do you get your hood to close completely, as my strut covers are too high and don't allow my hood to close completely! 
Thank you for your time.


Advertise With GS!
 
Fuel your mustang love.
Leaderboards
gotstang owns

© 2004-2015 Gostang.com

All product names are the trademarks or registered trademarks of their respective companies

gotstang.com is not affiliated with Ford Motor Company