
this will be my official build page. stay tuned for updates.
the background:
i have the original 302 shortblock with heads, cam, intake. the block has 143,000 miles on it. i put a 62mm turbo on it. then i converted from efi to carb.
i dyno'd the car at 577 rwhp and then took her to the track and ran a 10.74 @125. shortly after that, the motor started oil fouling one of the plugs on the driver's side. i had to replace the plug every other day just to keep the car running decent. i was afraid i had cracked my block.
we took the motor out and took it apart to find the problem. turns out it was just a ring. that's good, but it kinda sucks too. i know i have already pushed this block beyond its capabilities. re-ringing the block and putting it back in was not going to happen.
the goal:
get a new block and associated parts and build the motor back up. the motor will be a 363ci 9.2:1 dart block. while i am at it, i am going to get rid of my existing 62mm turbo and the turbo kit it came as part of and fabricate my own turbo kit using a new, bigger turbo. i will be re-using my tfs heads and weiand intake.
the parts:
the parts list so far... this is still growing. hehehe
- milodon 7 qt oil pan
- milodon oil pickup
- milodon steel dipstick
- ARP oil pan bolts
- standard volume oil pump
- romac lightweight balancer
- cammotion custom grind cam (dur: 234/228, lift: 564/560, lcs: 114, cl: 110)
- motorcraft lifters
- cloyes timing chain
- felpro mls head gaskets
- spec stage 3 plus clutch
- sfi-approved lakewood bellhousing
- extended clutch fork
- masterpower 70mm turbo
- tial 50mm blow off valve
- tial 60mm wastegate
- bbk shorty headers
- two 2.5" v band clamps
- one 3" v band clamp
- 3.5" flowmaster universal tailpipe kit
- two 2.5" j bends
- one 2.5" u bend
- one 3.5" u bend
- t4 flange
- two flowmaster reducers (from 3 inch to 2.5 inch)
- one 2.5" stainless flex joint
- diecast aluminum valve covers
- modified transmission mount (set motor back 1 inch)
- oil filter remote mount kit
- temperature gauge (air intake temp)
- UPR solid motor mounts
- 4.125 bore TREperformance race prepped Dart 4 bolt main block
- TREperformance forged steel 4340 3.4" crankshaft for 363 (balanced with the rest of the assembly to a 28oz imbalance)
- TREperformance 4340 Forged H beam rods 5.315" for 363
- Clevite P rod/main bearings
- Probe SRS 2618-t6 high alloy lightweight forged pistons
- Speed Pro high performance moly rings
- ARP head studs
- 3.5" to 3" and 3" to 2.5" silicone adaptors (for cold side piping)
- MMR front tubular a-arms
- MMR front coil over conversion (14" full race kit)
the removal:
the parts (illustrated):
|
DIY turbo kit in a box! lol | |
|
the masterpower 70mm turbo, and the tial 60mm wastegate and 50mm blow off valve. |
update: 7/3/07
got the MMR coilovers and MMR a-arms installed this weekend.
|
the MMR tubular a-arm next to a stock one | |
|
the stock a-arms and eibach sports springs on the left, MMR tubular a-arms and coilovers on the right. cheese n' rice look at all that extra room! | |
|
plenty of room to route the turbo down pipe! | |
|
|
update: 7/22/07
|
john taking advantage of the delay with the motor... idle hands, ya know! lol | |
|
welding up all the holes on the driver side | |
|
and on the passenger side | |
|
making progress with the engine bay welding. the towers are mostly welded up, the front panels are welded in. got the firewall still to do and thinking about doing the front strip as well. may do the holes near the top of the fenders when we take the fenders off for painting... thats still a little ways away. |
update: 8/10/07
we got the whole motor put back together today. tomorrow we will be getting the transmission on and then we will insert everything back into the car. we'll prolly begin fabricating the turbo kit on monday when the kids go back to school.
|
TEH BLOCK FINALLY CAME IN!!!!! wooty woot!!
it only took 5 months. sheesh. | |
|
and so the engine build begins... painting the block. | |
|
head studs installed | |
|
the cam being inserted | |
|
timing chain installed | |
|
timing chain cover installed | |
|
water pump and harmonic balancer installed | |
|
lifters installed | |
|
heads and solid motor mounts installed | |
|
rocker arms, headers, intake, and phenolic spacer installed | |
|
carburetor and bonnet installed | |
|
the chrome alternator and assorted brackets installed. |
update: 8/13/07
the motor and tranny are back in the car!! turbo fabrication begins!!
|
clutch installed | |
|
all the pulleys are installed | |
|
scattershield installed | |
|
everything back in the car!! | |
|
started the fabrication with mounting the turbo and getting the down pipe done up... in the first pic, the reducer on the left will be what comes off the turbo (3" | |
|
here is the reducer fitted to the down pipe | |
|
welding it on | |
|
the down pipe being clamped onto the turbo | |
|
the turbo and down pipe mounted in the car | |
|
the passenger side header with the reducer. we clipped just a bit off the end of the header to mate the two pipes: | |
|
the passenger header installed | |
|
another shot from below of the passenger header |
update: 8/14/07
got more of the down pipe done and more of the crossover pipe done.
|
here is the crossover piping (on the bottom) and the down pipe (over the crossover) from the passenger side | |
|
here is the crossover piping (on the bottom) and the down pipe (over the crossover) from the driver side | |
|
here is the drivers side header routing up to the flange | |
|
another shot of the drivers side header routing up to the flange | |
|
the passenger side header, the down pipe, and part of the crossover all welded up |
update: 8/16/07
finished up the drivers header and the crossover pipe and dropped that off for welding. we just got the drivers header and the crossover back tonight. it all bolted back up beautifully!!! lotsa pix coming...
|
the drivers side header and the rest of the crossover. the joint for the header and crossover came out perfect. in this picture i don't think you can see it well, but the crossover pipe has a slip fit on one end and the mount for the wastegate on the other end.
| |
|
drivers side header mounted | |
|
the drivers side header, the turbo and down pipe, and in the very background the crossover | |
|
the turbo and the crossover joint | |
|
a nice shot from under the turbo | |
|
the passenger header, wastegate mounted, and the down pipe | |
|
the down pipe isn't connected to the exhaust yet, but that's next |
update: 8/17/07
|
the final piece to the hotside piping was the wastegate routing | |
|
i thought this pic was kinda funny... looks like my car is shrugging at me like "wtf man??" lol |
update: 8/23/07
update: 8/26/07
update: 9/4/07
update: 9/9/07
update: 9/11/07
|
we decided on the following: we purchased a 5 gallon fuel cell that will be mounted in the trunk. this will serve as our water reservoir. a bosch cobra water pump will be sucking the water through the system. | |
|
we decided to use a stock cobra heat exchanger that will be mounted right behind the front bumper, in front of the condenser. we are purchasing two low profile 5.6 inch fans that will be mounted on the heat exchanger. each fan pulls 300 cfm. and finally, we purchased a 12x12x4.5 inch air-to-liquid intercooler off of ebay. this will be mounted on the driver side front corner. it will physically be mounted inside the front clip. we have it mounted now (with zip ties! lol) so we can mock up piping and make sure the positioning of everything is perfect. this is the only thing i have pix of right now. |
update: 9/16/07
|
the fuel stuff. crap. had to drill holes in the tower. lol | |
|
throttle bracket and cable. | |
|
the coil and the turbo oil lines. | |
|
here is the intake for the turbo. this was done using a layer of fine metal mesh with a layer of fine nylon fabric and another layer of fine metal mesh. | |
|
we decided to go with red instead of blue for the trim pieces. with the coil and the distributor and everything else that comes red, it just seemed to make sense. | |
|
we're gonna have to trim a little of the scattershield. lol kind of a tight fit. | |
|
down pipe connected to exhaust. |
update: 9/20/07
|
first things first, for those of you that expressed concern about the coil, this first pic is to show where we moved it to. | |
|
the following pictures are of the motor and turbo with intercooler mounted and assembled. the only things missing is the coil wire and the plug wires... yes, she's that close! | |
|
the blow off valve mounted. | |
|
the intercooler mounted. | |
|
the new fabricated valve covers (with the special john polish) | |
|
miscellaneous pix | |
|
a sneak peek at the trunk. |
update: 9/23/07
|
the trunk is done. the reservoir is mounted and plumbed. | |
|
remote oil filter and radiator overflow relocated and mounted. | |
|
coil, distributor, and plug wires are all installed and connected. OOOHHH!!! my fender is back on! | |
|
the heat exchanger with fans is mounted. i took this picture just to show them, but their permanently mount is hidden up behind the bumper where i can't really get a good pic. |
update: 9/25/07
SHE'S ALIVE!!!!!


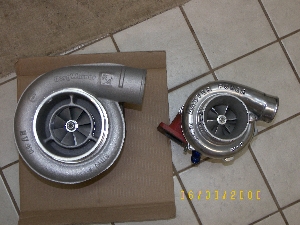


 and goes into a 3.5" down pipe. the one on the right will be used for coming off the passenger side header into the crossover.


 302 to 363ci & 70mm turbo build


